Microsoft Teams Calling Integration and Configuration Process
Connecting ALICE with your organization's Microsoft Teams account allows employees to receive video or audio calls from the ALICE Receptionist to their Teams account on their desktop or phone application. Giving your employees the ability to verify their guests visually helps strengthen your building's security.
ALICE can also be configured to call non-Teams phone numbers, such as an employee’s desk phone or mobile phone number.
Related Videos

Prerequisites
For ALICE to call Microsoft Teams users, you must provide a Microsoft Teams user from your organization. This Teams user must be dedicated for use for the ALICE Receptionist system.
To enable ALICE to call the Microsoft Teams users in your organization, you need to complete these three actions on your Azure tenant.
-
Configure Microsoft Azure Communication Services (ACS).
-
Grant the ACS services permission to the organization's Teams account.
-
Create an Application Resource for ALICE on your organization's Entra ID tenant.
For non-teams phone calls, ALICE provides two options:
-
Utilizing your Teams account to make calls using a phone number owned by your organization.
-
Utilizing the ALICE Receptionist's cloud communication service to make calls to PSTN phone numbers.
This document covers the above steps and should be used with the instructional video on ALICE Integration for Microsoft Teams Calling.
Creating the Azure Communication Service (ACS)
You will need access to an Azure account with permissions to manage applications in Azure Active. The first step involves creating a Microsoft Azure Communication Service (ACS) resource for your organization which can be used by the ALICE Receptionist system.
-
Log in to Azure Portal with a Microsoft account that has administrator rights.
-
If you have more than one Directory for your organization, choose the Directory that includes your Microsoft Teams deployment.
-
On the Azure Portal Home page, select the Create a resource button.
-
Use the search option to search for “Communication Services."
-
Select Communications Services from Microsoft Azure Service.
-
On the Communications Services page, click the Create button.
-
Select the Subscription this service should be installed on.
-
Select or create a Resource Group this services should be installed on.
-
Provide a name for your new resource instance.
-
We recommend “ALICE-MS-TeamsCalls” as the resource name.
-
-
Click the Review + Create button
-
After verifying the information is correct, click the Create button.
-
Microsoft will deploy the resource on your tenant. You will see the “Deployment is in progress”.
-
The deployment can take a few minutes or longer.
-
-
Once you see the “Your deployment is complete” message click the “go to resource” button.
Capture Resources Details
Creating the ALICE Application in Azure
Next, you’ll need to capture and store some information to configure the ALICE system for Microsoft Teams calling.
-
On your Communications Service home page, expand the "Settings" menu and select the Keys page.
-
On the Keys page, under the "Primary Key" section, copy the Connection String for the Primary key. Store it in a document so you can retrieve it later.
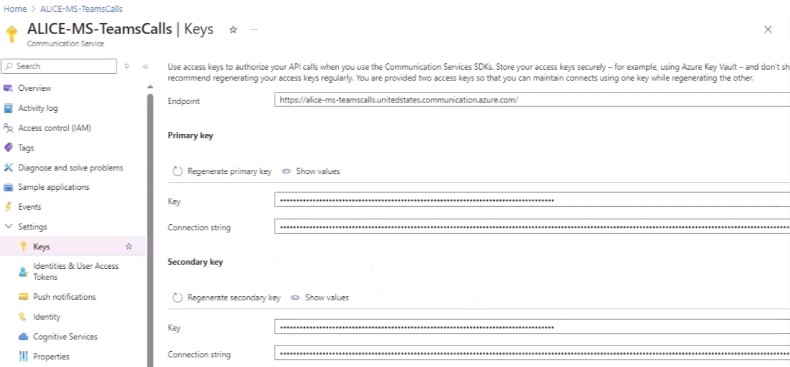
Next, you will need to capture and store the Immutable Resource ID for this ACS resource.
-
Expand the "Settings" menu on the Communications Service page and click on the Properties page.
-
On the Properties page, locate the Immutable Resource ID and copy the value. Store it in a document so your can retrieve it later.
Granting the ACS Resources Access to Microsoft Teams
Creating the ALICE Application in Azure
This step involves granting permission to access the ACS resource to the Microsoft Teams account. You will use the PowerShell interface for your Azure account and must be an administrator for your Azure and Teams organization.
-
Launch Microsoft PowerShell as an administrator.
-
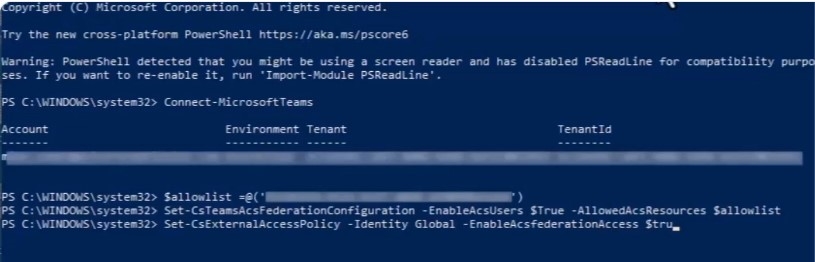
Run the command “Connect-MicrosoftTeams” to log into your Microsoft Teams account as an admin user.
-
Note: If the Microsoft Teams module is not already installed, run “Install-module MicrosoftTeams” command. Once installed, run the connect command again.
-
-
Run the command “$allowlist = @(‘IMMUTABLE_RESOURCE_ID’)”. Replace the word “IMMUTABLE_RESOURCE_ID” with the Immutable Resource ID value you captured earlier when creating the Azure Communication Service.
-
Run the command “Set-CsTeamsAcsFederationConfiguration -EnableAcsUser $True -AllowedAcsResources $allowlist”
-
Run the command “Set-CsExternalAccessPolicy -Identity Global -EnableAcsFederationAccess $true”
-
Exit the PowerShell interface.
Creating an Application Resource
Next, we need to register an application resource for ALICE that allows Microsoft Teams to authenticate users with your Azure organization.
-
Open your organization's Azure Portal home page and choose the Microsoft Entra ID service.
-
From the Overview page, expand the "Manage" menu and select the App Registrations page.
-
Click the + New registration link.
-
On the Register an Application page, enter a name for this app registration. We recommend using “ALICE-MS-TeamsCalling.”
-
Select the accounts that will support your organization.
-
In our example, we select "Accounts in this organizational directory only" since all users are in a single tenant.
-
-
Leave the "Redirect URI" section blank.
-
Click the Register button to register the app.
-
Select the application created.
-
On the "Overview" page, copy the "Application Client ID" Value and store it in a separate document.
Creating the Client Secret for Authentication
-
On the "App Registration" page, expand the "Manage" menu and click on Certificates & secrets.
-
Click the + New client secret link.
-
Enter a description for the client secret, such as “ALICE-Teams.”
-
Select the length of time this client secret will be valid.
-
Set a reminder for 30 days before the secret expires. Once this secret expires, the ALICE system will not be able to authenticate, and Teams calls will fail.
Once expired, a new client secret will need to be created and inserted into the ALICE Portal's integration section.
-
-
Click Add to add the client secret.
-
Copy the "Value" from the screen and store it in a separate document.
-
Once you log out of your session, this secret will be encrypted, and you will not be able to retrieve it.
-
Adding Permissions
Microsoft Graph and ACS APIs will need to be granted permissions.
-
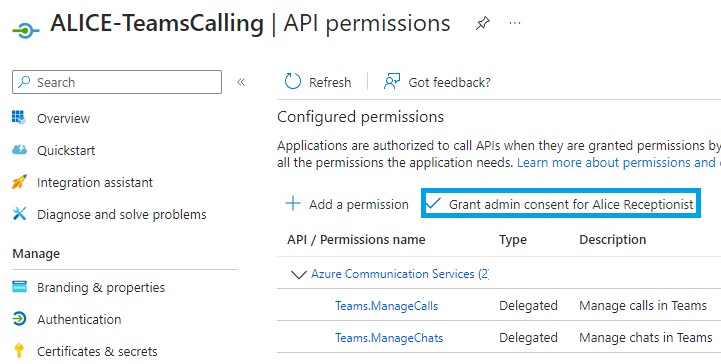
Select API permissions from the App Registration page.
-
Click the + Add a permission.
-
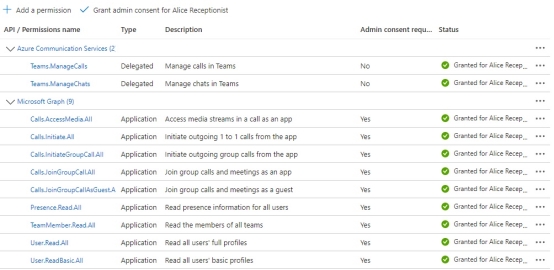
Add the following permissions:
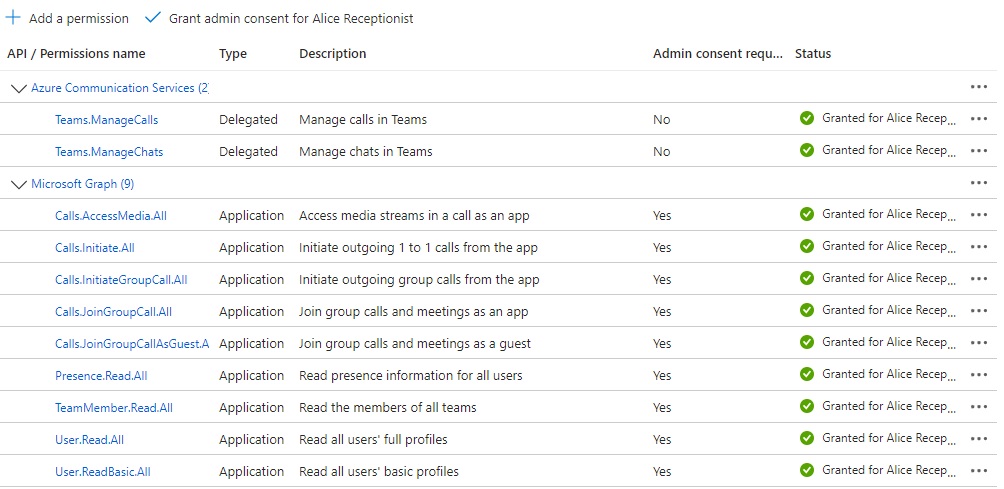
API Name Type Permission Azure Communication Services Delegated Teams.ManageCalls Delegated Teams.ManageChats Microsoft Graph Application Calls.AccessMedia.All Application Calls.Initiate.All Application Calls.InitiateGroupCall.All Application Calls.JoinGroupCall.All Application Calls.JoinGroupCallAsGuest.All Application Presence.Read.All Application TeamMember.Read.All Application User.Read.All Application User.ReadBasic.All -
After adding the above permissions, click the Grant admin consent for Alice Receptionist button.

-
When done, the API Permissions screen should look like the below screenshot.
Configure ALICE For Calls to Non-Teams Users (PSTN Calling)
You can use the ALICE Cloud communication service or configure your ACS service with your organization's phone number for PSTN calling to non-Microsoft Teams users. A non-Teams user is defined as any phone number, such as a mobile phone or desk phone number. These are often referred to as PSTN numbers.
Securing A Phone Number
Your organization will need to acquire a phone number to assign to the ALICE Receptionist system.
There are two options: Purchasing a new number from Microsoft or port an existing number into the ACS resource.
Option 1 – Purchasing from Microsoft
-
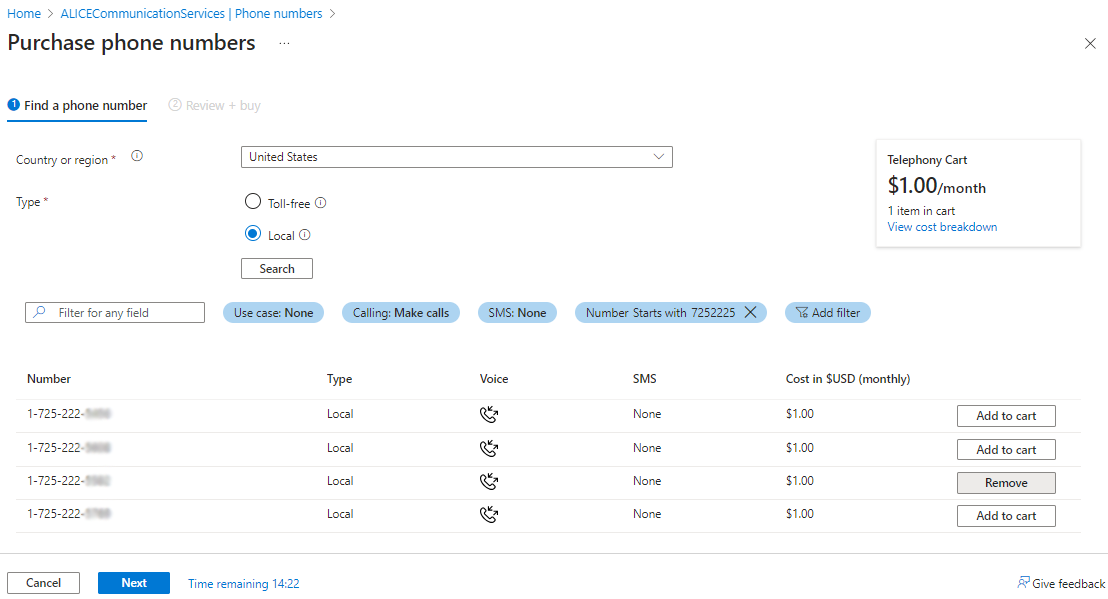
Expand the Telephony and SMS menu on your ACS resource page and click on the Phone Numbers page.
-
Click on the +Get a phone number link.
-
Choose a country and area code.
-
Select the country where you want the number to be based.
-
-
Select the type of phone number:
-
This number will only be used to make outbound calls. We would recommend selecting Local for the phone number type.
-
-
Set the following filters to find an available phone number
-
Use case = None
-
Calling = Make calls
-
SMS = None
-
If you would like to have a number from your area code, set a filter to “Number Starts with” and enter your 3-digit area code.
-
-
Select a phone number from the list of available numbers.
-
Click the Add to Cart for the phone number you want to purchase.
-
Click Next to continue.

-
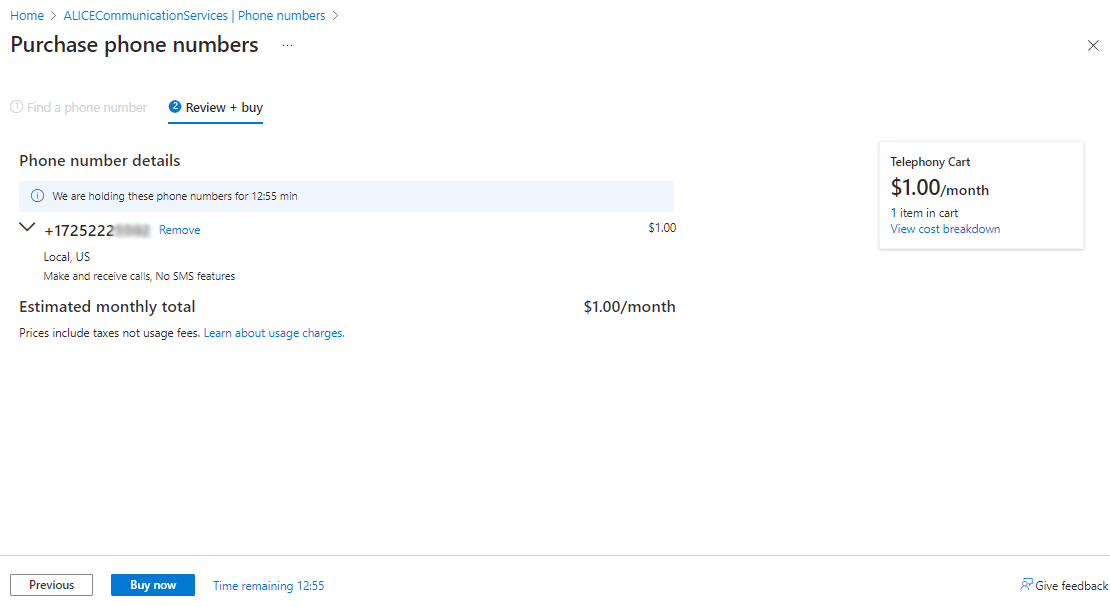
Upon reviewing the information and pricing, click the Buy Now button to complete the transaction.

-
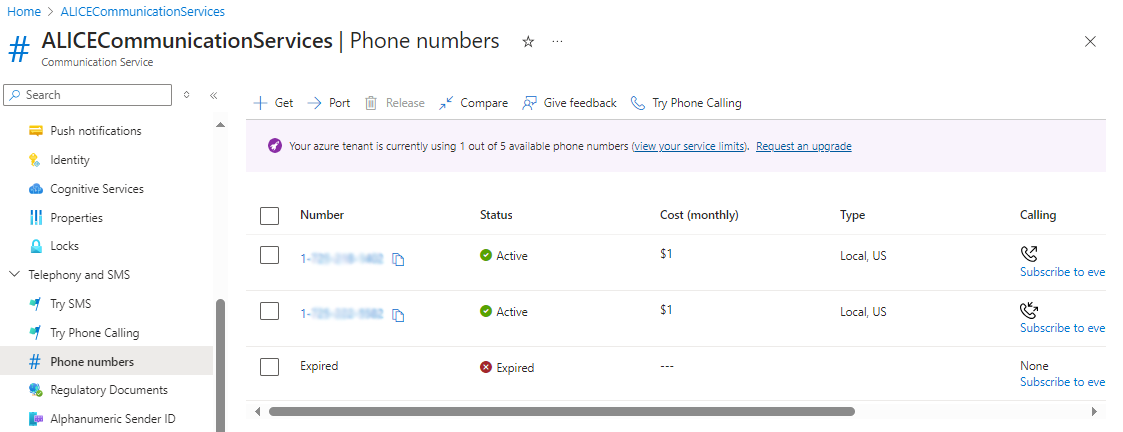
After the purchase transaction is complete, the phone number will be displayed on the phone numbers page of the ACS resource.

Option 2 – Port an Existing Phone Number
If you have an existing phone number with another provider, you can port it to ACS.
Follow Microsoft's instructions on porting an existing number.
ALICE Portal Configuration
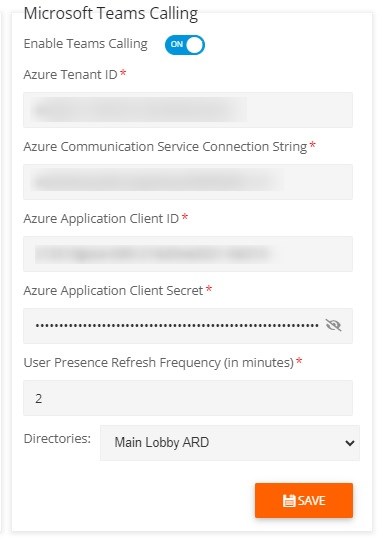
The final step is to insert the credentials saved earlier into the ALICE Portal.
-
Log into the ALICE Portal as an ALICE Administrator or Client Administrator.
-
Under Account Management, navigate to the Global Settings section.
-
Under the Sync Integration tab, select Microsoft Teams.
-
Toggle "Enables Teams Calling" to on.
-
Enter your organization's Azure Tenant ID.
-
To locate your Azure Tenant ID, log into the Azure Portal and open the Entra ID resource. On the overview page, copy the "Tenant ID."
-
-
Enter the Azure Communications Server Connection String
-
This is the primary key saved earlier when creating the Connection String.
-
-
Enter the Azure Application Client ID.
-
This is the Application Client ID saved earlier when creating the application in Azure.
-
-
Azure Application Secret Value.
-
Enter the value you saved earlier when creating the client secret for authentication.
-
Set the User Presence Refresh Frequency to 2 minutes.
-
-
-
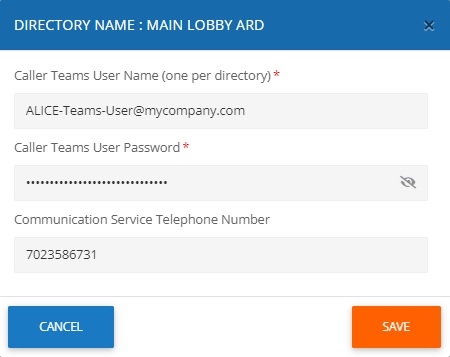
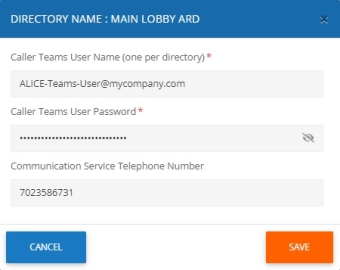
Select the ALICE Directory that will use the Teams calling feature from the Directories drop-down menu.

-
A pop-up window will appear. In the "Caller Teams User Name," enter the user's name of the Teams user assigned to the ALICE directory.
-
Enter the Teams user's password.
-
If the ALICE Directory will be calling non-Teams users, enter the phone number associated with the Azure
-
Select Save.
-
After saving the Directory settings, Save your settings for the Microsoft Teams Calling.
-
You can now configure Teams calling for Employees using the Call Type Teams Audio or Teams Video.