ALICE Portal Translations Tab
The Translations tab customizes text on the ARDs![]() The ALICE interface that appears on the ALICE Kiosk in your Lobby, also known as the ALICE Receptionist Directory, including those in different languages.
The ALICE interface that appears on the ALICE Kiosk in your Lobby, also known as the ALICE Receptionist Directory, including those in different languages.
Sorting Translations
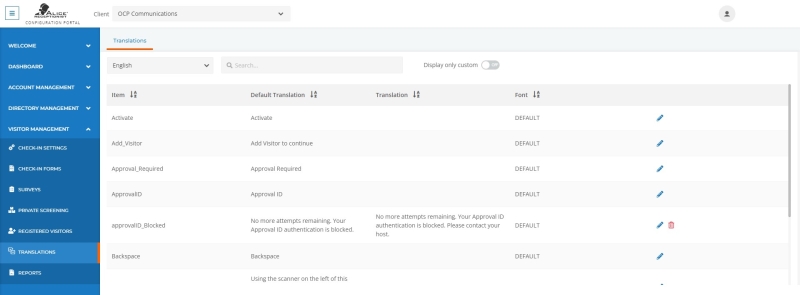
There are three options to find a translation listing:
-
Use the drop-down menu to select which language to provide a custom translation for.
-
Use the "Search" field to search for the text to edit.
-
Toggle “Display only custom” to "ON" to narrow down the Translation listings to ones that have previously been customized.
Each language listing has four columns:
-
Item – The name of the text to be translated.
-
Default Translation – The default translation of the text.
-
Translation – The custom translation provided for the text.
-
Font – The font that the translated text will appear in.
Editing a Translation
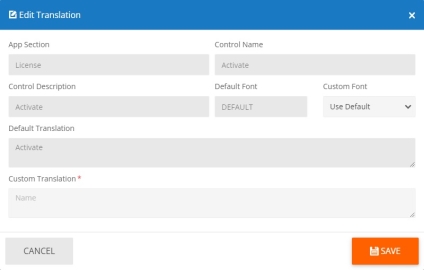
Click the  icon in the last column of the row. A pop-up window will appear where the listing's settings can be edited.
Note: Some fields cannot be edited.
-
App Section – The section of the software this translation is related to.
-
Control Name – The name of the Translation listing.
-
Control Description – The description of the Translation listing.
-
Default Font – Shows the default font that will be used for the Translation.
-
Custom Font – Use the drop-down menu to select a different font for this text. Leaving the option as "Use Default" will leave the font unchanged.
-
Default Translation – The original text for this Translation listing.
-
Custom Translation – The custom text that will appear.
Restoring a Default Translation
To restore the default settings for a Translation listing, use the  in the Translation listing's row. This will delete the custom text and restore the default settings.

