ALICE Portal Departments Tab
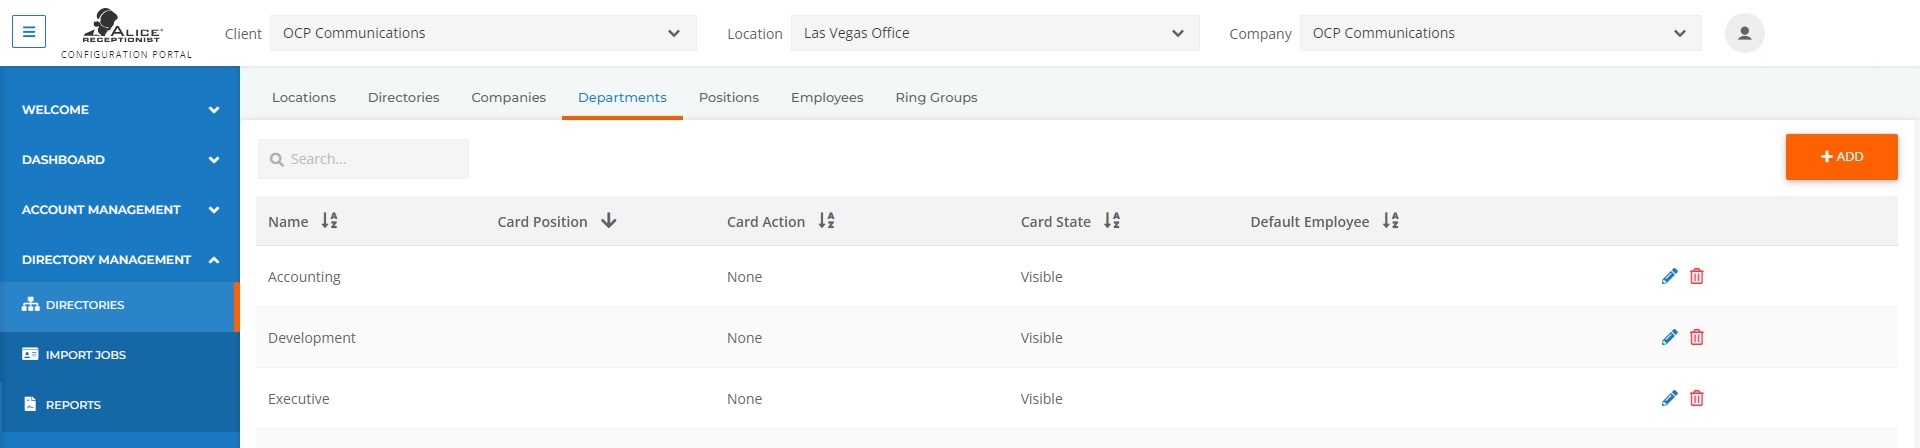
The Departments tab includes options to create, modify, or delete Department listings. Department cards represent your departments on the ARD![]() The ALICE interface that appears on the ALICE Kiosk in your Lobby, also known as the ALICE Receptionist Directory. Department listings are not required but can be used to group Employee listings or provide department-level support to visitors.
The ALICE interface that appears on the ALICE Kiosk in your Lobby, also known as the ALICE Receptionist Directory. Department listings are not required but can be used to group Employee listings or provide department-level support to visitors.
Departments are assigned to Companies, so verify that the correct Company is selected from the drop-down box at the top of the page before creating a new Department Listing or if an existing Department Listing doesn’t appear.
Related Videos
Creating a New Department
To add a new Department to an ALICE system, select the orange Add button in the top right corner of the screen.
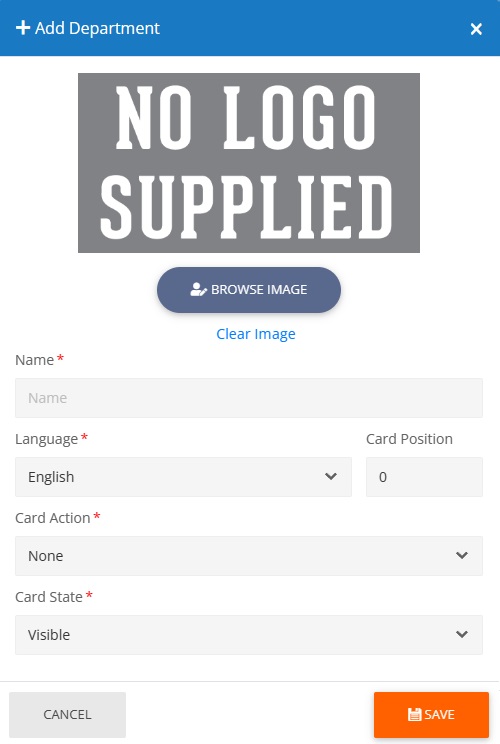
Use the Browse Image button to upload the logo that will appear on the card.
The default card size is 400 x 130. If a custom card size is being utilized, review the ALICE Configuration wizard on the ALICE Kiosk PC to see if a custom size is used.
-
Name – The name that will appear on the card.
-
Language – The default language that will be used when the card is selected.
-
Card Position – Assigns an order to the cards that appear on the ARD. Cards with a lower position number will appear earlier on the list. For cards that share the same position number, they will be displayed alphabetically. Any card without a position will appear alphabetically after all the cards with an assigned position number.
-
Card Action – Card Actions determine what occurs when a visitor selects the card on the system.
- None – Displays a list of Employees within the Department.
-
Call – Dials the Employee identified under the “Default” Employee field that appears when this option is selected.
-
Default Employee – The Employee or Ring Group selected from the drop-down menu will be called when this card is selected. The drop-down menu only displays Employees currently in the Membership.
-
Executable – When selected, the card will launch an executable in the ARD’s content space. The executable is based on the path specified in the “Executable Path” field that appears when selecting this option. The application needs to be installed on the ARD PC.
-
Executable Path – The file path on the local ARD PC where the executable is located.
Note: The ARD does not support third-party applications. The executable that is loaded may not function properly within ARD. The ALICE Support team does not assist with third-party application troubleshooting or guarantee the ongoing functionality of any application embedded within the ARD.
-
-
Image – Displays an image, such as a message, map, information, directions, etc. The image displayed must have its path defined in the “Image File” field that appears when this option is selected.
-
Image Field – Include the image’s file path. The ALICE Kiosk PC must have access to this file. For the fastest response time, it is recommended that the file be stored locally on the ALICE Kiosk PC running the ARD.
The ideal media dimensions are 1080 x 1097 for landscape systems and 1024 x 1080 for portrait systems.
-
-
Ring Group – Calls a specified group of individuals. The group called can be set using the “Ring Group” field that appears when this option is selected.
-
Ring Group – Use the drop-down menu to choose the Ring Group you would like this card to call. The Ring Group must be connected to an Employee who is a part of the ARD's membership.
Note: When assigning a Ring Group to a Department or Company card, you must use the "Ring Group" card action. The "Call" action will result in a failed call.
-
-
URL – Displays most websites supported by the ALICE-embedded Chromium browser. The website displayed is defined in the “URL” field that appears when this option is selected.
-
URL – Insert the web address that will be opened when this card is selected.
-
Remove Links – Checking this option turns off links on the website displayed on the ARD, preventing navigation away from the specified page.
-
Show Keyboard – Checking this option enables an on-screen keyboard for the user to populate fields on the web page.
-
-
Video – Opens and plays a video on the ARD. The video played is specified in the “Video File” field that is displayed when this option is selected.
-
Video File – Include the video’s file path. The ALICE PC must have access to this file. For the fastest response time, it is recommended that the file be stored locally on the ALICE Kiosk PC running the ARD.
-
Loop Video – Enabling this option loops the video when it’s finished.
-
Fullscreen video – Enabling this option stretches the video to fill the entire content space.
-
-
Card State – This field changes how the card's appearance on the ARD, including visibility and positioning.
- Visible – The default option that shows the card on screen with the name displayed on the card.
-
Card Hidden – The card will not display on the ARD.
-
Name Hidden – The card will be displayed, but the name will be hidden. This is typically used for cards that display a logo or graphic.
-
Static – Locks this card to appear on every page of the Directory list.
-
Static and Name Hidden – Applies the "Static” and “Name Hidden” functions onto a single card.
-
Play Video On Click – When specific card actions are enabled, the "Play Video On Click" option allows for the ALICE Receptionist avatar to speak when this card is selected. The message that will play is determined by the “ALICE Video” field that appears when this option is enabled.
-
ALICE Video – Include the ALICE Receptionist avatar video’s file path. For the fastest response time, it is recommended that the file be stored locally on the ALICE Kiosk PC running the ARD.
-
ALICE Video Loop – When enabled, the ALICE Receptionist avatar will repeat its message until the visitor selects another card.
-
Editing a Department
Click the  icon in the last column of the row. A pop-up window will appear where the listing's settings can be edited.
Refer to the above Creating a New Department section for more information on each field.
Click Save to finalize the listing.
Adding a Department Card to an ALICE Directory
There are two requirements for a Department card to appear on the ALICE system.
-
At least one Employee must be assigned to the Department listing. Department can be added to an Employee. Refer to the ALICE Portal Employees Tab section for more details.
-
Department cards must be enabled in the ALICE Configuration on the ALICE PC.
-
Launch the ALICE Configuration and navigate to the Layout Tab section.
-
Check the box that says “Show Department Directory.”
Note: When Show Department Directory is selected, all Employee listings must have a Department assigned to appear.
-
Removing a Department from an Employee
To remove a Department from an Employee, the Department must be removed directly from the Employee’s listing in the ALICE Portal. Refer to the Employee Details Tab section for the appropriate field.
Removing a Department from an ALICE Directory
There are multiple ways to remove Department listings. The method chosen can give different results.
-
Remove Employees from one Department from the ALICE Directory – Use the ALICE Directory’s Membership to remove the check mark by any Department Employees from the system. Refer to the ALICE Portal Directories Tab section for more details.
-
Remove Department cards from the ALICE Directory – In the ALICE Configuration wizard, use the ALICE Configuration’s Layout settings and remove the check mark by the option “Show Department Directory.” Employees within the Department will still appear on the system.
Deleting a Department Listing From the ALICE Portal
Click the  icon on the far-right column of the row. A pop-up window will ask for confirmation on deleting the listing from the database.
Any Employees assigned to a deleted Department listing will stay in the database, but their Department assignment will be removed.